
The last tab on the right panel is Exports and is comprised of the following main sections and sub-sections. Please note that these are contextual to the Type selected under Model Settings in the Setup tab. Some export settings are also contextual to the selected Export Target, i.e., Custom or Library, and the following image gives an overview of the two.
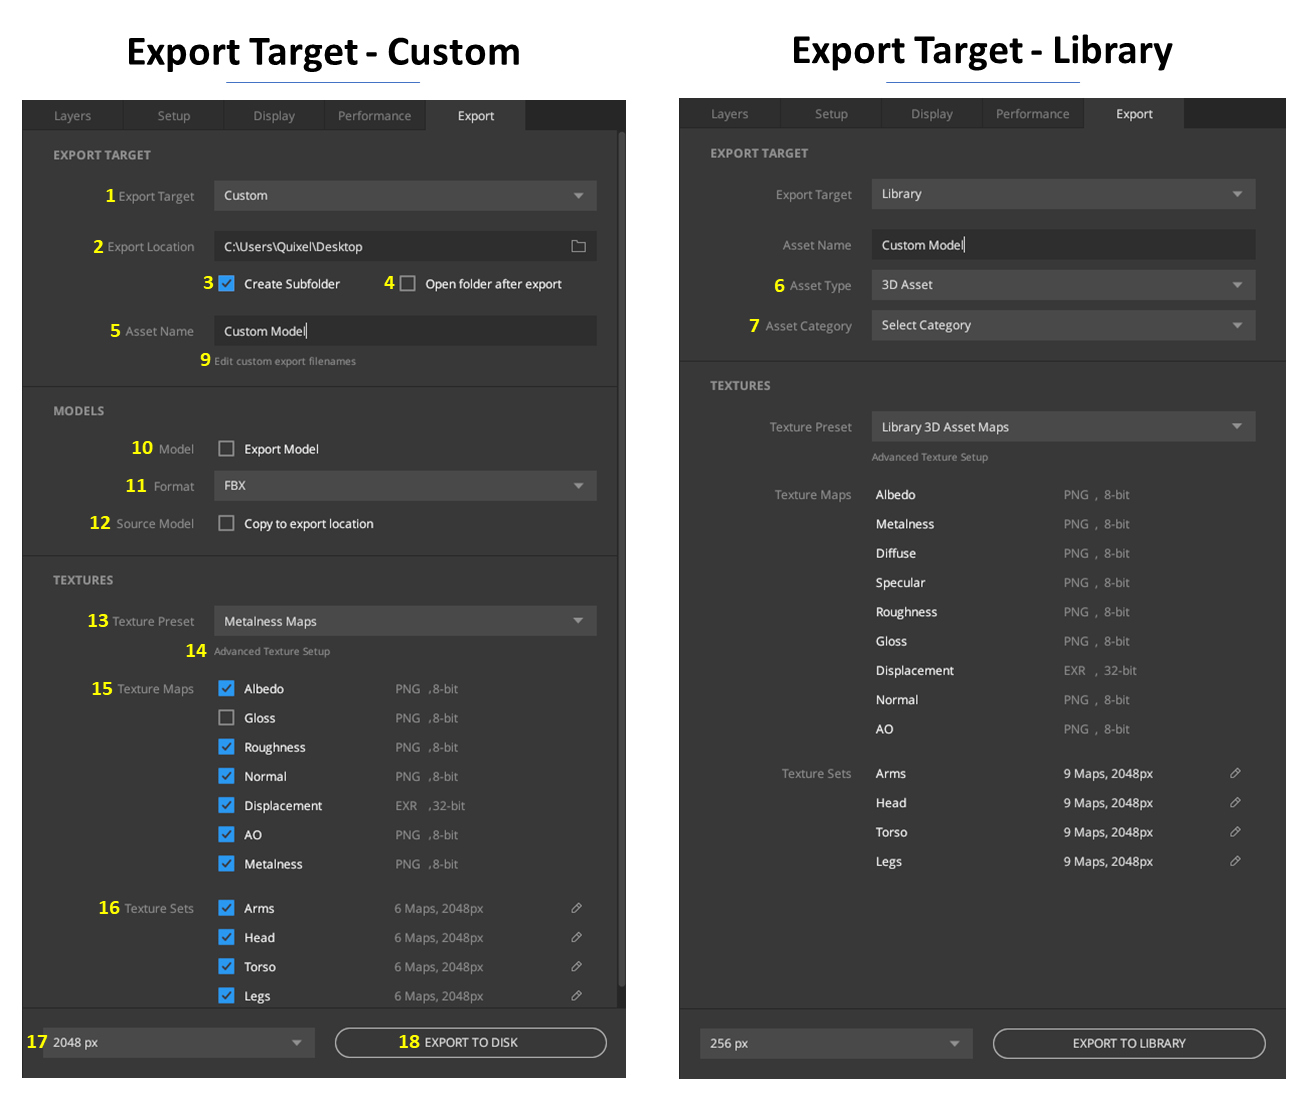
Export Target
1. Select Export Target: Select one of the two ways for exporting
your assets, i.e., Custom location or Library. Learn more about these
here.
2. Export Location: For custom assets, browse to your folder of choice for export. While exporting to
the library, this will not be visible as the default path for the library will be
utilized. Learn more by having a look at the
Folder Structure.
3. Create Subfolder: Select to create a subfolder with the Mix’s name to hold the exported maps.
4. Open folder after export: Once the export is complete, selecting this option will open the folder in which
your maps will be exported.
5. Asset Name: Select a name for
your exported Asset.
6. Asset Type: Visible when exporting to
the Library, select from either Surface, Displacement, or 3D asset for further
options.
7. Asset Category: You can select or add a category
for assistance in finding your exported asset at a later time.
8. Area: When Plane is selected at a certain size in the Setup Tab, this
 option will be visible to indicate that size while setting up exports.
9. Edit ‘custom export filenames’: Use this option to access a separate panel allowing you to enter a custom naming
convention for your textures, models, and folders. More on this
here.
Models
10. Toggle Export of Model: Use this option to toggle the model’s
export and will incorporate the scale factor.
11. Format:
Select available formats for the model.
12. Source Model: Use
this option if you want to export the model to the desired location without carrying
any changes from Mixer.
Textures
13. Texture Presets: When exporting Custom Assets, use this to
toggle between Specular, Metalness, or your own presets. For exports to
Library, toggle between the
different bit-depths for your textures.
14. Advanced Texture Setup: Use
this
option to access a separate panel and gain granular control over your exports.
15. Texture Maps: View or select which maps should be exported. (Uneditable when exporting to
Library)
16. Texture Sets: View or select which Texture Sets
should be exported. (Only the resolution per texture set can be edited when
exporting to Library)
17. Select Resolution: Select a resolution here that will be
applied to all maps on Export. In case you have selected different resolutions for
different texture sets, they will be updated as ‘Multiple Resolutions’.
18. Export to Disk/ Library: Click here to begin the export process.