
An expansion of the Basic Export options, the Advanced Texture Setup gives you granular control over the export options by opening a separate window. You can access this panel by clicking on the ‘Advanced Texture Setup’ in the Export Tab, Textures section.
This window will also pop up when clicking the
![]() icon when the Texture Sets list is visible in the Export tab.
icon when the Texture Sets list is visible in the Export tab.
This page will cover the three tabs that the Advanced Texture Setup is comprised of.
- Texture Maps
- Texture Sets
- Displacement
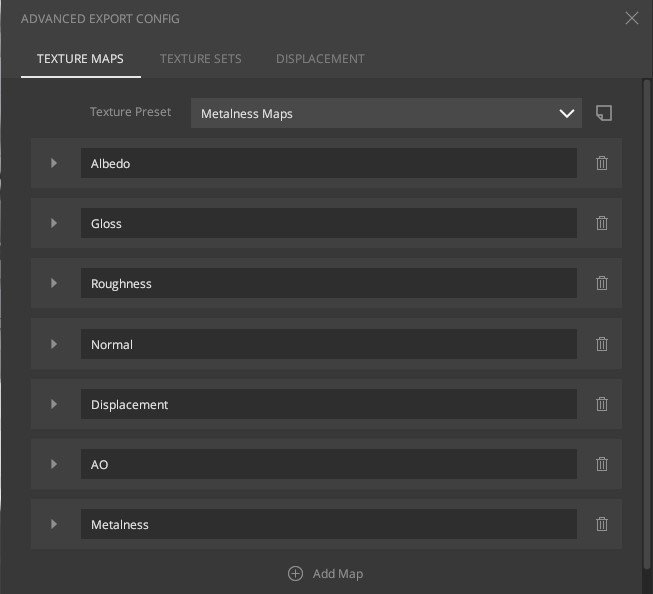
1. Texture Maps
This tab will contain all the maps available for export. By default, you will have a
few of the basic ones already visible and selected. However, to add a custom map for
export, such as the one used for
Mask Exports, you will have to
scroll down to the bottom and click
 . Click here to learn more about
adding a custom channel for export.
. Click here to learn more about
adding a custom channel for export.
a. Texture Presets
With the advanced options, you will notice the Metalness Maps preset loaded by default and a visible list of maps available for this preset. If you have created new presets, they will also be available in this drop-down.
By customizing each map’s available options, you can create your selection of maps
with modified channel packing, bit depth, file format, etc. By clicking the ‘Load or
Save’ icon
![]() , you can save valuable time by creating a preset that best suits your project
requirement.
, you can save valuable time by creating a preset that best suits your project
requirement.

b. Map Properties
By clicking on the arrow located on the left of the map name, you can access properties that can be customized.
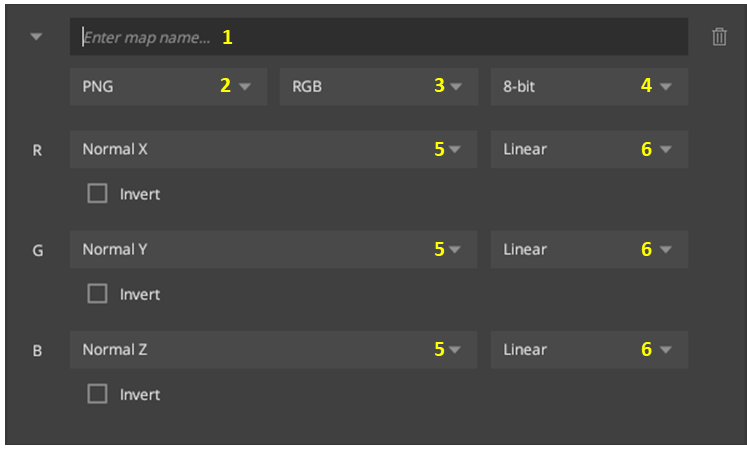
- 1: Name of the map file.
- 2: Select file format. Each format has a different set of channels and bit depth available. For a comparison of the file formats available, see the details in the following topic.
- 3: Number of channels to include in the map. Select between Greyscale (single channel), RGB (three channels), or RGBA (four channels).
- 4: Bit depth of map file. Select between 8, 16, and 32-bit.
-
5: Select data for a specific channel. For more information, see
the Map Options section below.
- If Normal or Displacement is selected, additional toggles will appear.
- 6: Type of data to fil channel with (Linear or sRGB). For more information, see the Color Space section below.
c. Image Options
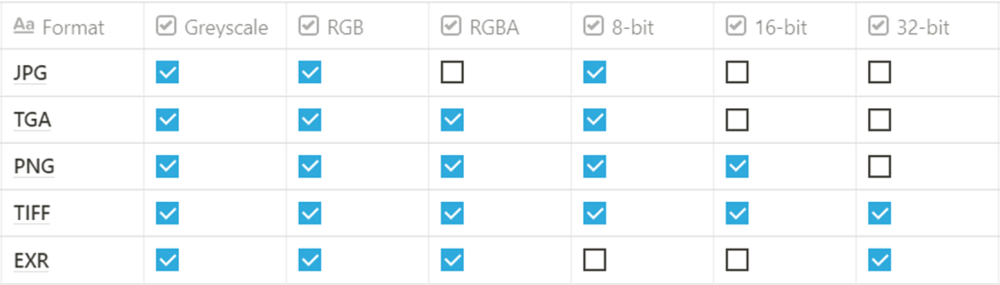
You can export maps to several file formats, and each format supports a different set of channels and bit depth.
1. Bit-depth
The bit depth controls the range of values that can be used. For example, 8-bit color depth supports 256 colors, which is often enough for most applications. However, Mixer supports up to 32-bit depth, which supports over 16 million colors. Using a higher bit depth will result in maps with a more significant size on disk.
2. Multi-channel Packing
Depending on how much information you want to export on a single map, you can choose between 1 (Greyscale), 3 (RGB), and 4 (RGBA) channels. Each channel can contain a different set of information.
3. File Format Comparison
4. Color Space
Mixer exports support both linear and sRGB (gamma) space values. Linear space values will be mathematically accurate and are used by default for the normal map and other greyscale values like gloss and displacement. On the other hand, sRGB values will be ‘corrected’ for visual accuracy and are used by default for the albedo/diffuse and specular maps. What you choose will depend on what the maps will be later used in and how that engine/renderer/DCC deals with linear and sRGB color spaces. In general, unless you require linear maps, sRGB maps are the more common option for most tools.
d. Map Options
You can fill each channel with a specific set of information about the Mix:
- Value: Enter a constant value to fill the channel.
- Diffuse/Albedo (R/G/B): The red, green, or blue color values of the surface.
- Specular (R/G/B): The red, green, or blue values of the specular reflections map.
- Gloss: The smoothness values of the surface.
- Roughness: The roughness values of the surface.
- Occlusion: The occlusion map values of the surface.
- Metalness: The metallic values of the surface.
Additionally, the Normal and Displacement maps have additional options when selected.
-
Normal (X/Y/Z): The X, Y, or Z values of the normal vectors of
the surface.
- An Invert toggle inverts the normals.
- Displacement: The vertical displacement values of the surface. This will be covered further on this page under the Displacement section.
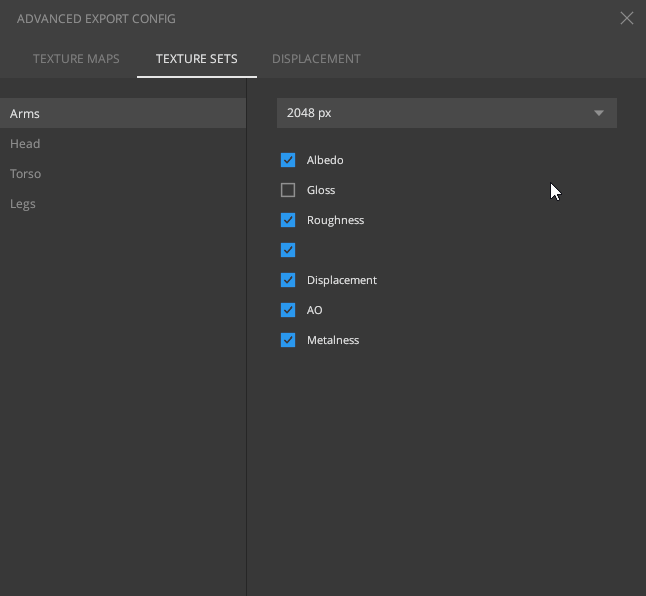
2. Texture Sets
You can multi-edit (or single edit) which maps get exported for each texture set in the texture sets tab and what resolution they get exported in. The list on the left will have the material names as set up in your DCC of choice, and in the case of UDIMs, the tile numbers will be displayed for easy identification. Clicking on a texture set will populate the maps available for export on the right, which you can toggle as per your requirement.
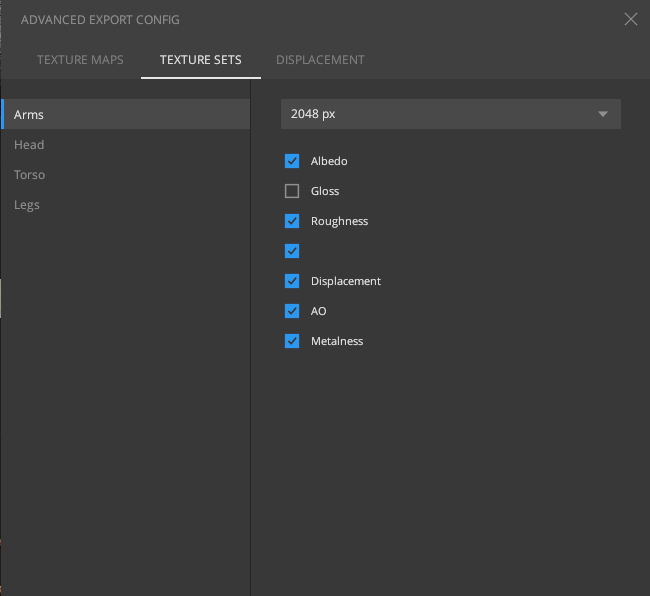
By default, all the maps from the previous tab are enabled for new sets.
This is a good place to set different resolutions for your texture sets, depending on the project requirements. When export resolutions differ between selected texture sets, you will notice “Multiple Resolutions” at the bottom of the export panel.
3. Displacement
The displacement tab gives you global output settings for the selected bit depth, i.e., 8, 16, or 32. So if your output chosen is, for example, 8-bit, then Mixer will apply the 8-bit settings set here when exporting.

For all bit depths, you will have the following options.
1. Normalize
This drop-down is used to normalize the displacement vectors and contains the following elements for further control.
a. Off: No normalization is applied.
b. Keep Midpoint:
Scaling around the midpoint until the brightest value is white or the darkest value
is black. The midpoint is forced to gray, and the range is “Varying”.
c. Full: Scales the output channel so that the brightest point is white and the darkest
point is black. The midpoint of exported maps would vary, and the range is
“Varying”.
2. Midpoint
Contextual to the selected Normalize option. If normalize is turned off, you can set the midpoint to either gray or black.
3. Range
The range determines how many centimeters of actual displacement is in one unit of the displacement map. The default value is set at 10 cm.